Monday, 19 September 2016

Fabric shopping and very early Christmas

On Friday I made my annual trip/ pilgrimage to the Handmade Fair at Hampton Court. This was the third time I'd been and it was as fabulous as ever (at least it was for sewing geeks like me). We also held a ridiculously early Christmas celebration as a family which involved homemade presents all round. 

First, the Handmade Fair AKA fabric shopping heaven. In anticipation of how much fabric I was going to buy, my Mum and my Aunt (who came with me, along with my sister) both gave me early birthday presents of money to spend at the fair. And what a brilliant present it was. Each year, there have been more fabric stalls and this was the best yet, with Sew Over It, Fabrics Galore, Maud's Fabric Finds, Girl Charlee and the Eternal Maker to name but a few. I ended up buying fabric for 15 projects (and heavily supplementing that birthday money) and two new patterns (including the new Rosa shirt pattern from Tilly and the Buttons. My problem now is that I can shop faster than I can sew!


It wasn't just about the shopping - we went to a couple of workshops which were great fun (although our makes left something to be desired) and went to a talk with Patrick Grant (this was a bit of a disappointment as we wanted to hear more about the Sewing Ber than we did. Throw some prosecco, lots of free sewing-themed badges, free Florentines and g&ts into the mix and it was a great day all round. Already planning our trip for next year - need to get saving!

The next day, we had a Christmas breakfast in Knowle - My aunt and uncle are off to Crete for Christmas so this was the last chance we could all get together to exchange presents with them. As ever, the brief was homemade gifts made from materials costing less than £10.

For Glenda, I made the Ruffle Bag from issue 26 of Love Sewing magazine. I used red stretch cotton for the bag and red Liberty Tana Lawn for the lining, both leftover from the Lilou Dress I made back at the start of the year. The bag was relatively straightforward to sew, with the ruffles themselves taking to most time. I already ad a red zip in the right size, so this actually cost nothing - bonus! I left out the inside pocket because I didn't have a small enough zip but I still think it's really useable. The only thing I struggled with was attaching the straps as the instructions weren't very clear - I will go with my instincts next time I make it and will attach it the way I would normally. Hopefully she will be able to wear it for all those nights out in Paleochora!


For Brian, I made the tweed patchwork scarf from issue 21 of Love Sewing magazine. If this looks familiar, it's because I made the same scarf for Dad last Christmas. I used the remaining tweed trousers and skirts bought from charity shops and soft needlecord for the back of the scarf. It's a simple project but looks really professional thanks to all the topstitching - this won't be the last time I make it. Yet again, this was a stash-busting project so effectively cost me nothing!


Final bit of news this time is that I found out that I was one of the winners of the Stitcher of the Year competition in Love Sewing magazine and I have won a Janome Coverpro machine. I'm over the moon and a bit overwhelmed as I've only been sewing properly for 3.5 years.  Can't wait to try out my new machine- just need to find space for it!

Sunday, 4 September 2016

A series of sewing disasters...

I've been pretty quiet of late, partly because we have been on holiday twice so not much time for sewing, but mainly because my latest makes haven't exactly been my proudest sewing moments.  Unusually, my latest projects have all been for other people (I'm usually a bit of a selfish sewer!).

It is my Mum's birthday next week and I decided to make her an arrowhead ribbon necklace from Love Sewing magazine. I had to search for ages to find 5cm wide grosgrain ribbon, but managed to source some gunmetal grey ribbon which I thought would go well with her wardrobe. I've never used this kind of fabric manipulation technique before and I enjoyed seeing the arrowhead design come together as I was sewing and ironing. As I was sewing, it was obvious that something wasn't right. The necklace was much wider than the version pictured in the magazine. I even posted a picture on Instagram and the pattern designer confirmed that the width of the ribbon should have been 2.5cm and it should also be longer than stated in the magazine. Sadly, I don't think it's wearable, but I gave it to Mum anyway in the hope she can find some other use for it! I will make this again in the right width at some point as I think it could look great. 


It was also Thomas's birthday recently and his latest obsession is Power Rangers. I managed to find some (extortionately expensive) Power Rangers Dino Charge fabric on etsy to make him some pyjama bottoms. I used the same pattern I have used a couple of times before but decided to make the next size up (age 5). They were enormous!  Luckily I was able to alter them easily so not too much of a disaster and definitely a big hit with the birthday boy. 


Finally, it is my 6th wedding anniversary today. 6 years is either iron or sugar. I found some fabric with jars of sweets printed on it (for sugar) and though I would make Gareth some boxer shorts. Not very original I know, as I've made him several pairs before, but he does need some new pants! I decided to save time when cutting out by folding the fabric in half horizontally. I hadn't considered the design on the fabric and the sweet jars on one piece were upside down. I can't believe I made such a basic mistake - think my brain is still in holiday mode. There wasn't much I could do, so I went ahead and made them anyway. 


Not a good run at all - think I'll stick to selfish sewing for a while!


Wednesday, 20 July 2016

Holiday sewing part 4 - vintage Liberty Fi Fi

On to the fourth and final holiday sewing project (there would have been many more but I ran out of time!).  I'm obviously hoping for hot weather and I have found the Fi Fi pyjamas from Tilly and the Buttons I made back in February to be perfect for Summer.  I decided to make another pair to take with me as we are away for a couple of weeks. 

My Mum was given some vintage Liberty fabric a while ago. She made my sister a Summer dressing gown with it for her birthday and gave me what was left. It is beautiful tana lawn, but the design probably isn't something you would make blouses or dresses from as it is a bit dated. However, it is perfect for sleepwear so I decided to use this for the Fi Fi. It is pink floral, so I bought some pink bias binding for the straps. The pattern includes self-made bias binding but I was up against it, time wise, and I also like the look of contrasting straps and trim. 

This is a relatively quick sew due to the small size of the camisole and shorts, despite quite a few details. As it is the third time I have made this (I also Mae a set for my sister for her birthday), I managed to sew it pretty quickly.  For some reason, the French seams really flummoxed me this time. Every time I went to pin it, I reminded myself to sew wrong sides together, then went on auto-pilot and sewed right sides together. I think I ended up unpicking 4 or 5 seams in the end. I'll put this down to rushing and possibly being distracted by holiday packing stress!  The pink binding looks good, but I ordered it online and it is much thicker fabric than I would ideally have used, so I'm a bit concerned about how comfortable it will be - hopefully it will soften in the wash. 

Although the fabric isn't necessarily something I would have chosen, it looks good made up and definitely has a retro feel. It was lovely to sew with (as all Libert fabric is), and will be comfortable to wear. Here is the finished result:


I was very excited to see that it matched my holiday nails too:


Right then, just need to get all this stuff packed and survive a long haul flight with two small children then I can relax and enjoy my hols!

Saturday, 16 July 2016

Holiday sewing part 3 - Playsuits!

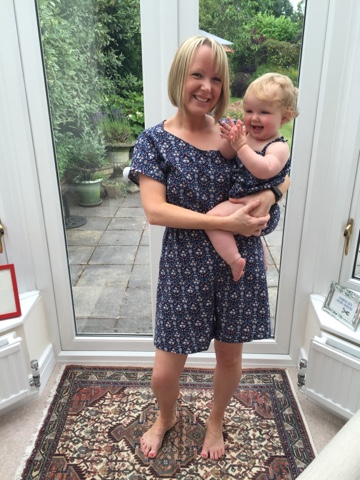
The holiday sewing continues at pace. This week I decided to try out the short version of the Poppy playsuit which is the newest pattern from Sew Over It. When the pattern was released, my sister sent me a message within minutes asking if I was planning to get it. Silly question really... I got some half price cotton lawn from John Lewis a couple of weeks ago especially for this project and also decided to make the drawstring romper for Polly in matching fabric from the One Little Minute blog. I saw this tutorial on Facebook a while ago and saved the link as I loved it. 

The Poppy playsuit is yet another pdf pattern (sort of getting used to them now).  Strangely, the sizing was different to other Sew Over It patterns and I fell between the 8-10 and 10-12 sizes so went for the larger one, which was probably a mistake in retrospect. I am planning to make the long version for nights out in the Autumn and will go for the smaller size as I think the larger one is unflattering. It is very comfy though and will be perfect for holiday.  

The playsuit was an easy sew, with elasticated waist and hook and eye fastening at the back. It took a bit longer than an evening as suggested, but not much. 

Polly's romper suit was more fiddly, although all quite straightforward.  It was the first time I have made rouleau straps and it will be the last until I buy some kind of tool to help turn them out. As it was, I used a chopstick and a lot of patience (and mad Gareth take over when I got too frustrated).  It was all worth it when I saw Polly wearing it - chubby baby cuteness overload!!

Here we are in our matching Playsuits:


And one of those chubby baby legs:


Monday, 11 July 2016

Holiday sewing part 2 - another Bettine

I'm marching on with the holiday sewing projects - nothing like a deadline for motivation (or fear that I'll have nothing to wear on my hols!).  I took a trip to John Lewis last weekend as I'd heard they had a sale on in haberdashery. It wasn't my usual store and the fabric selection was much smaller with not much in the sale. I did pick up some cotton lawn for another project, but then got tempted by some beautiful (non-sale) Amy Butler cotton. It was more than I had planned to spend but Gareth wasn't around to see and I knew it would make a fabulous Bettine!

The cotton is thicker than I would normally use for this dress but it still has some drape and the design is really striking. Following some advice I learned from the Great British Sewing Bee (congratulations Charlotte btw - you were my favourite from the start!), I refolded. Before cutting so the main flower design went centrally down the front and back bodice and skirt pieces. I'm so pleased I heard this tip - it's obvious really, but I've always tended to just go with folding selvedge to selvedge and the design looked so much better this way. 

I chose to make the version with pockets (always love a pocket) and sleeve tabs as I love the extra details. I remembered it was possible to squeeze it into two metres of fabric from my last Bettine and made sure I added the right seam allowance for the facings this time. The fabric was a dream to sew with, it is so soft. 

It was worth treating myself to this fabric as the end result is great and it's so soft and comfortable to wear. Now onto the next holiday sewing project!


Monday, 4 July 2016

Holiday sewing part 1 - Tulip Skirt by Sew Over It

I'm off on my hols soon (super excited!), and in the past I would have spent a lot of time and money shopping for a holiday wardrobe. Not so now - I can sew myself one instead!  I've got a few projects in mind for my holiday, and I'll be stitching like mad over the next couple of weeks to get them finished in time. 

The first item on my sewing 'to do' list was the Tulip Skirt from Sew Over It. I bought the pattern when it was first released and had earmarked some lovely nautical fabric bought at the Handmade Fair to make a summery skirt. I love this fabric so much that I'm planning to make a bag and possibly even a hat as well if I have time with the leftovers. 

I was nervous about making a tulip skirt as I worried it would be unflattering, given my shape (post two v big babies!).  I usually fit a size 10 in the Sew Over It patterns and I cut this out without thinking or measuring - oops!  After putting in the pleats and back darts, I fitted it to my dummy and realised there was no way this was going round my waist, despite the fit being perfect everywhere else. I almost gave up, then remembered some advice my Mum gave me ages ago when I made a dress too small by accident- take out some of the darts. I took out the wider two back darts and cut a new waistband. Yay - it worked, and had the added benefit of making it stick out less at the hips, which is more flattering for my shape. 

The invisible zip was pretty much the best I've sewn, and I managed to get the waistband to sit perfectly level either side - something I normally struggle with. I took an extra centimetre off the length when hemming as I'm so short. 

Overall, I'm pleased with this and will definitely make it again, probably in the shorter length to wear with tights in winter. I haven't got a photo of me wearing it (pasty legs and bad hair on the day I made it), so here it is on the dummy:


Saturday, 18 June 2016

Back to the classroom (except at home!) - Carrie Trousers and Silk Cami

I made a promise to myself a few weeks ago that I wouldn't buy any new fabric or sewing patterns until I have worked my way through all the projects on my to do list. I broke the promise almost as soon as I made it when I saw that Sew Over It were offering online classes in trouser making and fitting. I have been tempted by their Ultimate Trousers pattern for ages - I keep seeing beautiful versions on Instagram. The classes include the pattern for those and also for Carrie Trousers, which are loose Summer trousers made in soft, drapey fabric. 

So not only did I sign up for the classes immediately, I also bought some fabric from their online shop to make them in.  Even naughtier, I treated myself to their silk Cami pattern and some fabric got that as well. I really must stick to my promise for a while now!!

I made the trousers in a black rayon with a rose print and the cami in a plain black rayon to go with them. Annoyingly, both patterns only came as PDFs and I have made my thoughts on sticking them together clear before. I really enjoyed the online classes - Lisa is an excellent teacher, although I confess that I skipped quite a few of the videos as these trousers are pretty straightforward to sew. I think I will find them more useful for the ultimate trousers as I imagine they are a lot trickier. The cami was also a simple project, but I'm now in love with both patterns - quick to sew, look great and almost as comfy as going out in your pjs (but more socially acceptable!). It is tempting to break that promise again and sew up more of both for Summer - they would be perfect for my holiday....

I wore both last night for a work night out, hence the glamorous surroundings of the office in this pic (I definitely wouldn't sanction any of the photos from later in the evening....):