Sunday, 1 July 2018

Tag you’re it!

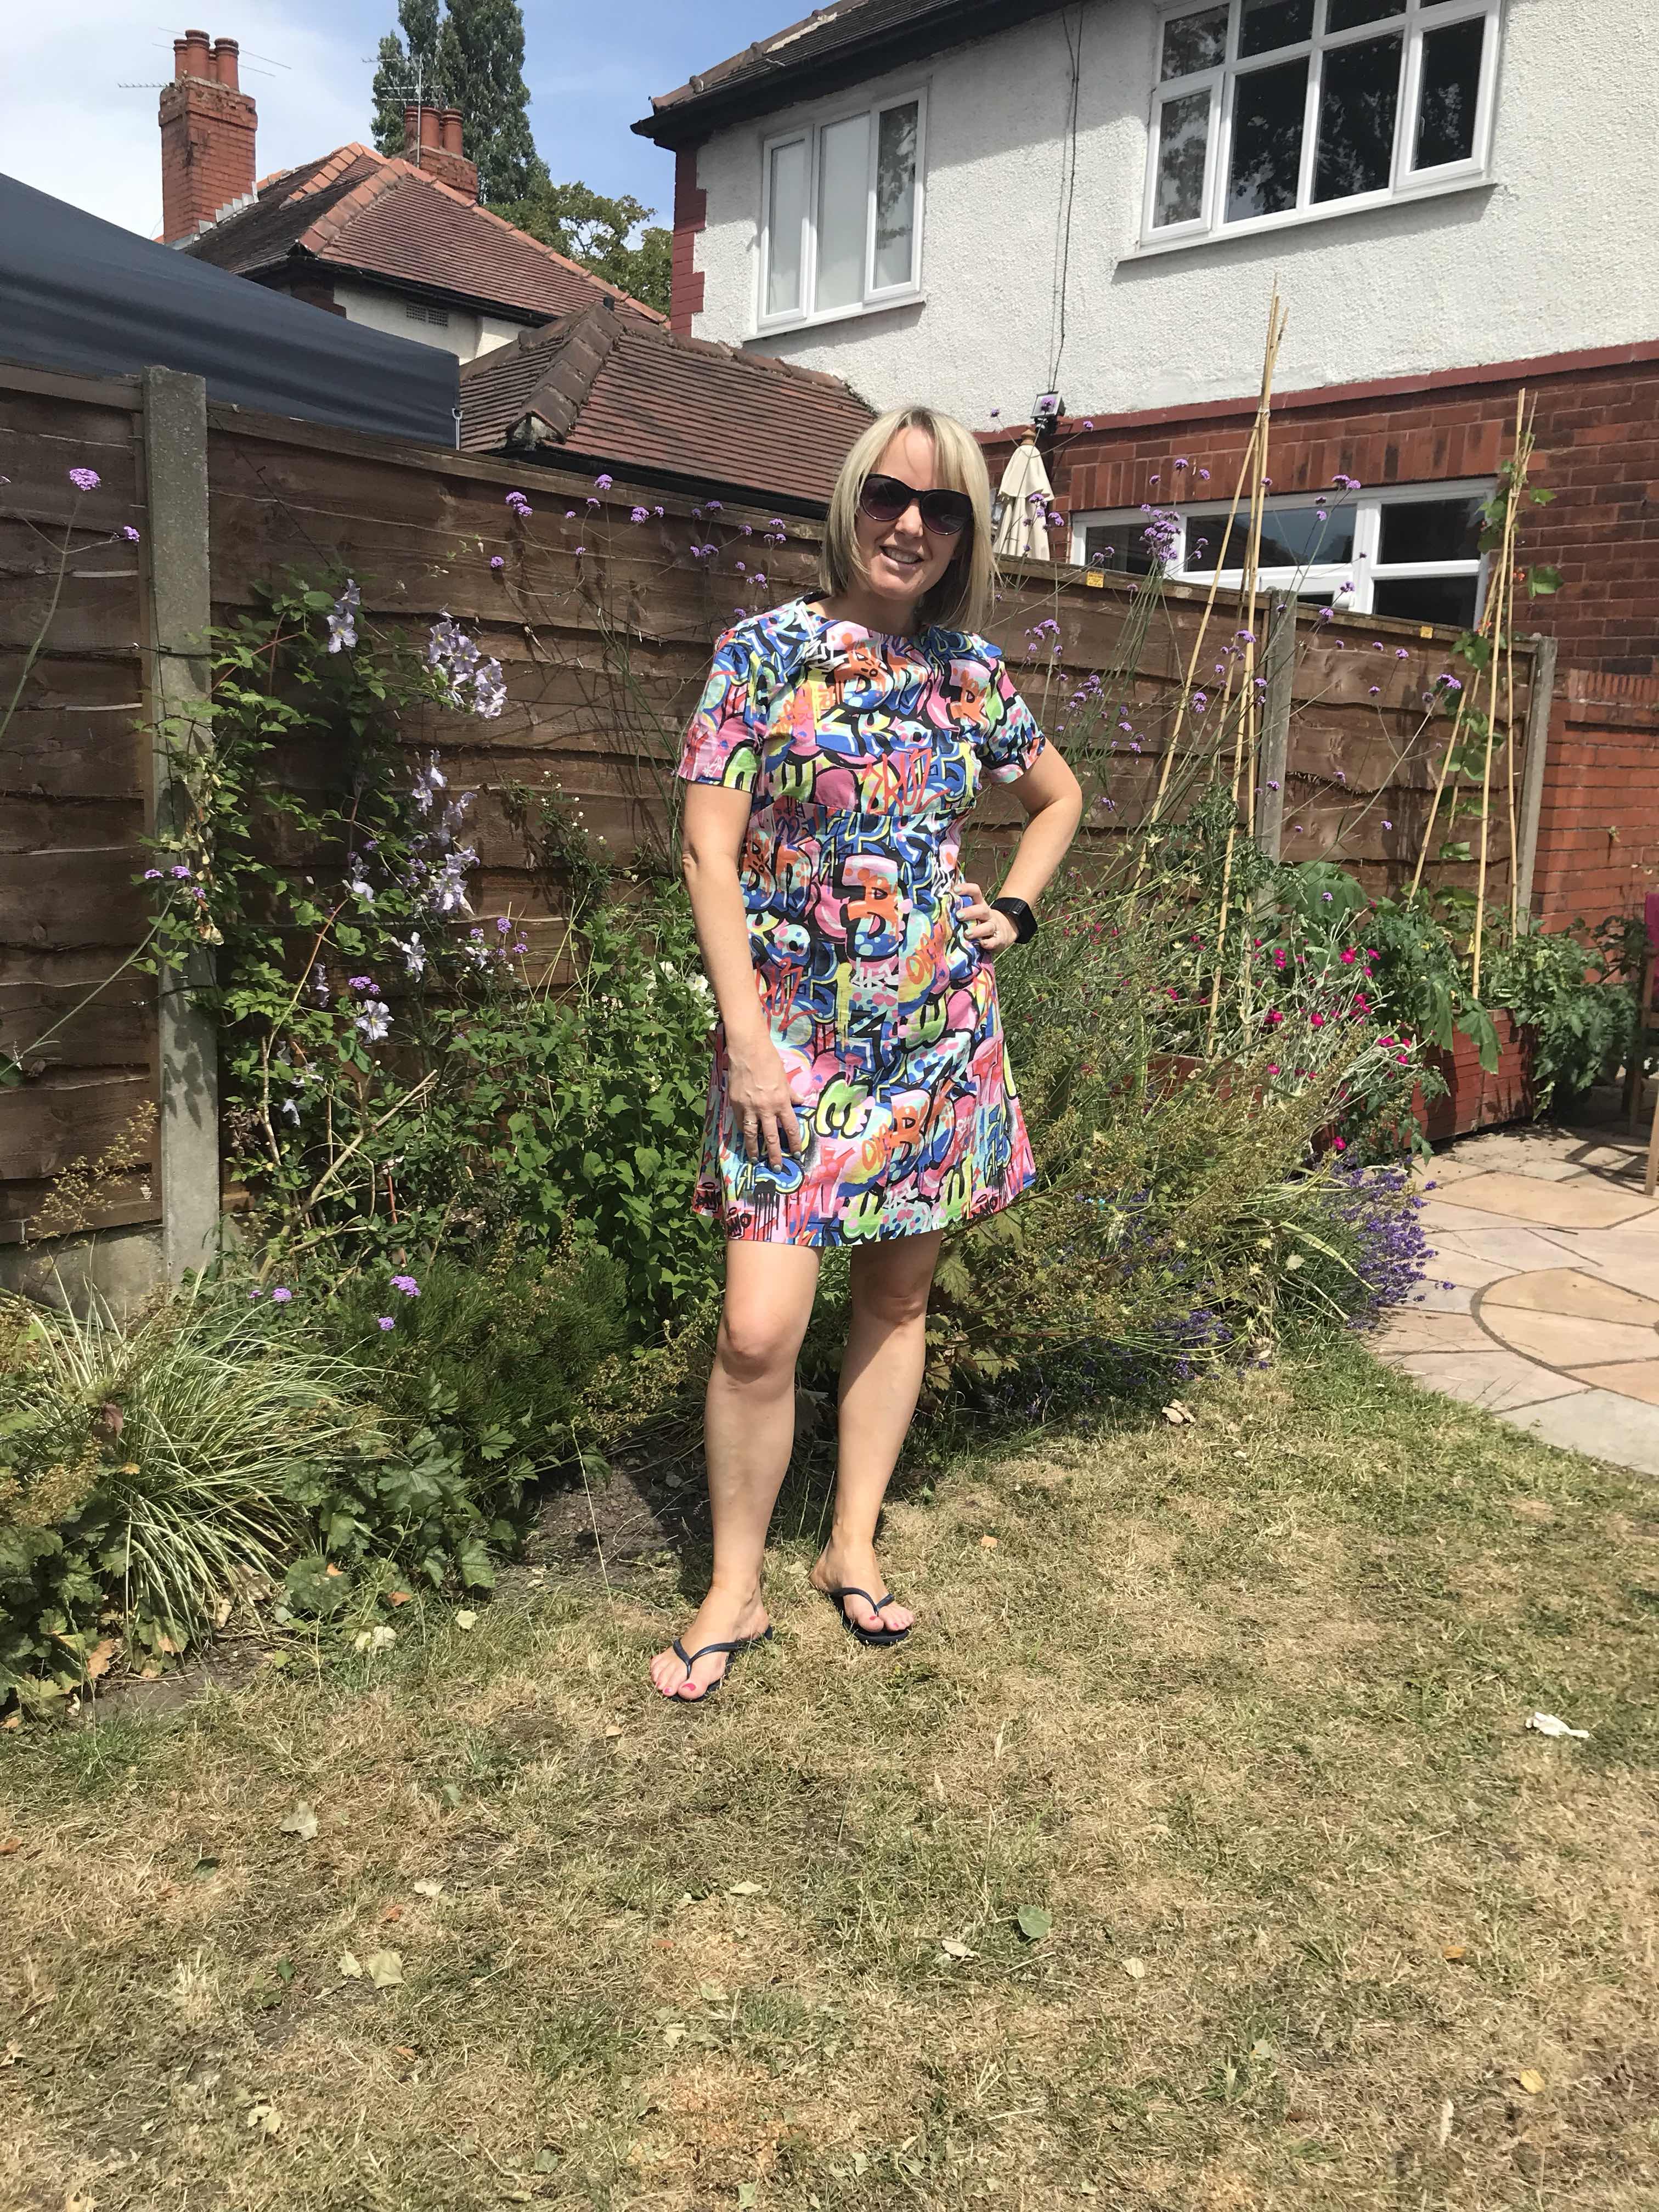
At the end of last Summer, I saw the new Alexander Henry fabric designs and fell in love with ‘Tag You’re It’, which is a retro New York style graffiti print. I’ve always loved old school hip hop and the opportunity to make a dress in this fabric was too good to be true. I bought the fabric straight away, then it sat in my cupboard for almost a year while I ummed and ahhed about what to make with it. I used a bit for the side and top panels for some board shorts for Thomas while I was trying to work out what to make. 

I came across a discussion on a sewing group on Facebook where someone had the same fabric and was asking for suggestions about what to make with it. Someone else suggested Simplicity 3833 which is a reissue of a 1960s pattern. It’s a simple a-line dress which suits a bold fabric design. It was a great suggestion and I ordered the pattern straight away. 

There were more pattern pieces that I expected, and I ended up cutting into the pattern itself rather than tracing off as I usually do in order to save time. For some reason, I got distracted by other projects, and this sat in a bag for about three months. We were going to a gig last week and I fancied making something new to wear, so picked it back up again. 

The bust dart seams were a new technique, and I’m not convinced that I’ve got the fit quite right. I really didn’t like the instructions or sewing order with this pattern, so ended up making it in the order I would normally sew a dress. I also changed the zip for an invisible zip. As I often find with Simplicity patterns, there is a huge amount of ease and it came up far too big. I took it in at the side seams which helped, but I think there are a few more adaptations I would make if I was going to make this again. 

The fabric is lovely quality and really nice to wear. I would be tempted to make the dress again in another fabric, but spend more time on fitting (as usual, I was sewing up to the wire with this!).


Tuesday, 12 June 2018

Crazy about Kitty

The Kitty dress by Maven patterns first came to my attention when my Mum and Sister went to Sewing for Pleasure at the NEC (without me - how very dare they!!) and sent me a picture saying they thought this pattern would suit me. They were right - it pretty much ticks all the boxes - retro 60s style, Peter Pan collar, puffed sleeves and pockets. However, I had so many other projects lined up at the time, it was only this week that I actually got round to making it, inspired by all this fabulous weather we have been having (hope I haven't tempted fate by actually mentioning it...).

I bought some green denim from Sew Over It especially for this project and it has been sitting on my 'to-sew' pile for a few weeks.  I cut the size 10 based on my measurements. The garment is only semi-fitted. I found sewing with the denim fine using a denim needle and had to make very few adjustments to fit. The central bust dart and centre front seam are both unusual features. I love how the bust darts change the grain of the denim at the top of the bodice. I chose to topstitch in co-ordinating thread rather than contrast thread due to the bright colour of the fabric. Contrast top stitching would look amazing with blue or black denim and I'm tempted to make another version doing this. 

I was really pleased with the collars when I turned them out until I noticed a tiny hole on one at the seam. In the past, I'd have been tempted to just leave it and hope for the best, but I've learned the hard way that things like that always get worse after washing so I re-did the whole collar piece. 

I'm really pleased with this dress, it's a perfect daytime Summer dress and I feel like it's closely aligned with my personal style. The colour is really bright, but who wants to be dull, hey?  I also made another Blackwood Cardigan by Helen's Closet in cable knit jersey from Higgs and Higgs, this time using a raspberry colour in the shorter length. All in all, I'm super pleased with this outfit and I can see it going into heavy rotation. 


Monday, 28 May 2018

Sweatshirts and Hoodies - Beep Beep and Stella

I absolutely love wearing hoodies - I've probably owned 100s over the years. Making the perfect hoodie for myself has been a bit of a holy grail, dressmaking-wise. Last year I made myself the Papercut Patterns Undercover Hood. Although it is really warm and I love the colour (pale pink sweatshirt fabric from Guthrie and Ghani), I've never been completely happy with the fit and style. Recently, my newsfeed has been full of Stella sweatshirts from the new Tilly and the Buttons book. I bought some dark grey sweatshirt fabric with silver glitter stars from Fabrics Galore at GBSB Live back in September which has been waiting for the right project. I decided to make it with the sleeves in a pale grey (also from Fabrics Galore) in a nod to the 90s. 

The pattern actually came free with one of the sewing magazines I subscribe to, so I decided to cut it straight out rather than trace off like I usually do. I cut out a size 3 (my usual size in Tilly patterns), but graded out a bit at the waist. I used sweatshirt ribbing (also from Fabrics Galore) for the cuffs and neck band. I decided to add a waistband after seeing this on someone else's version  as I hate tops and jumpers to be too short, and used the ribbing for this as well. I cut the body pieces and hood from the star fabric and sleeves from pale grey. I used a remnant of grey jersey for the hood lining. Having made hoodies for the kids and myself previously, the construction was straightforward, with the hood itself taking the most work. Tilly's instructions were excellent as ever. I added the buttonholes for the drawstring but wished I hadn't as they weren't completely level so I decided to leave out the drawstring so as not to draw attention to them. I'm really pleased I added the waistband as I like the slightly longer length. I'm really happy with the fit and style of this hoodie - I think this is the pattern I have been looking for!

I had quite a lot of fabric left and I decided to use the leftovers to make the kids a Beep Beep Sweatshirt from Made by Jack's Mum from the latest issue of One Thimble sewing magazine (an awesome digital magazine full of sewing patterns for kids which I have only just discovered). For Polly, I used the star fabric for the body and sleeves and pale grey for the side strips and pockets. I made Thomas's in reverse. This is such a great kid's sweatshirt pattern - I love the raglan sleeves and the side strip/ pockets are a great opportunity to colour block/ stash bust. MBJM always have great instructions as well. I think this is my new favourite kid's jumper pattern. It was so quick to sew and I'm already planning more. I'm not sure I'll ever made the version with the road appliqué, but it is so versatile, I'm sure there will be lots of variations over the years as it goes up to age 12. 

We are off on a glamping holiday today, these are bound to get a lot of wear!


Monday, 21 May 2018

Summer in the City - the Zoe Dress

I am absolutely loving this beautiful weather we have been having recently. Even though I've been under the weather, the sun always puts a smile on my face. The only downside is that I work in possibly the hottest office in the universe. Comfortable cotton Summer dresses are a must, so I was really excited when Sew Over It released the Zoe Dress pattern. It is a semi-fitted dress with princess seams and most importantly, in-seam pockets (gotta love a dress with pockets!). I found some beautiful Japanese floral cotton from Higgs and Higgs, which has a heavier weight which is perfect for a slightly more structured dress. 

My measurements came out as a size larger than I usually make, so I cut out in this size. This is quite a straightforward sew, but I struggled with mistakes as I have done with all my recent projects. I've found it quite hard to concentrate while I've been ill. When I'm feeling myself, I'm sure this could be made in a couple of evenings.  The fabric was lovely to sew with, I'd definitely get more in different colour ways/ designs. 

When I tried the dress on, I was disappointed with the fit, it was far too loose and I wished I had made my usual size. I managed to take it in at the back side seams (it was too hard to alter at the front due to the pockets), and that rectified it. I have had this problem a couple of times recently - think I probably need to stick with the size I have made before with particular pattern houses, as I keep making stuff that is too big. 

I'm so pleased with the finished dress, it is perfect Summer work wear, I will be making plenty more!


Saturday, 12 May 2018

Back in time - Mila Dungarees

Everywhere I turn at the moment, people are wearing dungarees. While I've been wearing my Cleo dungaree dresses for ages, I haven't taken the plunge with full dungarees yet. When I saw the Mila pattern by Tilly and the Buttons, I decided to give it a go. The last time I wore dungarees was to youth club disco when I was about 13, so these are definitely a blast from the past!

I bought some amazing pineapple print stretch denim from the Denim Company to make a dress a while ago. However, I decided to repurpose as soon as I saw this pattern. Pineapples and dungarees seemed like the perfect combination. The pattern is designed to be quite fitted, so I decided to make a size up as I wanted them to have a looser fit. I managed to cut them out with quite a lot left from 2m - planning bags/hats from the remainder. 

As usual, the instructions from Tilly are fantastic. The first parts of the construction (front and back bibs, pockets and straps) reminded me of making the Cleo dress. I opted for black topstitching rather than the yellow I had initially planned. I was pleased with this decision, as it doesn't detract from the design of the fabric.  Although the instructions were clear, I made a right hash of the waistband. I stitched the inside bands on the wrong way twice and spent a lot of time unpicking. I've been feeling ill, and this project was mainly completed in short bursts as a way of trying to make me feel better. My concentration hasn't been great, so I'm blaming the mistakes on that!

Once I got my head round the waistbands, the rest came together quickly. I finally used some silver buttons I bought for another project years ago that was abandoned. The fit of the bib and waistband was spot on but the legs, especially around my hips and thighs was huge. I increased the seam allowance on inside and outside legs to remedy this. I'm pleased with the final result, although it feels weird to wear dungarees again after all these years. About half way through completing these, I got another dungaree pattern free with a sewing magazine. I might tackle that pattern next. 


Monday, 23 April 2018

Some cute pyjamas and my Me Made May pledge

I've been busy with a couple of projects that I can't tell you about yet (all will be revealed very soon), but I'm the meantime, I sewed up some super cute pyjamas for Thomas and Polly to wear on a recent weekend away.  I started by making a pair for Thomas after he moaned that I don't make things for him (untrue by the way!). As soon as Polly saw them, she asked where hers were, so I made a pair for her. For both of them, I used the Made by Jack's Mum harem pants pattern for the bottoms and the explorer raglan pattern for the top. I extended the sleeves to make them full length at Thomas's request. Both fabrics are from my Girl Charlee stash. 

Here they are looking lovely despite very little sleep 


It's that time of year again, and I need to make my Me Made May pledge. I really want to challenge myself this year and also use this as an opportunity to think about what I actually wear and sew more of these wardrobe staples (I'm always getting sidetracked by party dresses!!).  I usually wear me made clothes so to push myself, my pledge this year is that between myself, Gareth and the kids, our family will wear at least 3 me made items between us each day during May, with as few repeat wears as possible. I also pledge to finish at least 4 projects for myself that are wardrobe staples, not party dresses. Phew! It's going to be an interesting month!

Thursday, 5 April 2018

60s style - I finally made a Coco

I've been seeing so many fabulous versions of the Coco Dress by Tilly and the Buttons recently. The pattern is a few years old and I wasn't too bothered by it when it first came out. My Mum bought the pattern last year and made herself a fabulous houndstooth print dress, which I loved. I traced off the pattern, and aside from making the top version for Mum for her birthday, forgot about it. 

Recently, everyone in the FB sewing groups I'm in seems to be making this. I was so inspired by all these fab makes, I went rooting through my stash to make a version. I had some gorgeous geometric print ponte that I bought in the sale from Girl Charlee a while ago. The pattern is very retro and I thought it would make a perfect Coco. I decided to make the dress version with rollneck, 3/4 sleeves and sleeve cuffs. I decided to leave out the pockets. I can't resist pockets usually, but I felt they would be a bit lost with this fabric choice. 

I cut the size 3, and found I used a lot less fabric than expected (more for another project yay!). This ponte is really thick and stable, absolutely brilliant to cut and sew with. I was a bit concerned that the dress would be too tight across my tummy, so took a smaller seam allowance there. In retrospect, I think I should have taken the standard seam allowance, as it is quite a loose fit. I added some hand stitches to the cuffs and collar to keep them in place and hide the topstitching, which is really visible due to being in black when against the white parts of the fabric design. This is a quick and satisfying sew, and really versatile - I can see this working well as a casual Summer dress without the rollneck. 

My only concern was that my fabric choice was so 60s, that when combined with the style of the Coco, it looked like I was going to a fancy dress party!  However, I felt less like this when actually wearing it. I can't believe I left it so long to make a Coco.